The Heart of the House

Some people say the kitchen is the heart of any house. But where I come from, that honor goes to the family room (sometimes affectionately referred to as “the TV room”). It’s where we go at the end of the day to relax on the couch, catch up on our favorite HGtv and Food Network TV shows, and sometimes pop in a Mad Men DVD and lose ourselves in 1960’s New York City. (If you haven’t started watching Mad Men, I highly recommend. But, alas, I digress).

We fell in love with our family room on first sight:


Family Room – MRIS Photo

You may remember this photo from our house tour – that’s how it looked when we first laid eyes on it.  Those built-ins? They make my heart go pitter patter.

Here’s how it looked on move-in day, after we tossed our furniture in there.

We originally had grand plans for our TV, which included mounting it above the fireplace. Then we realized that 1) was really high up on the wall, and not really compatible for viewing; and 2) would require drilling through the beautiful built-ins to accomplish. So onto the old TV stand in front of the windows it went, with an upgrade in its (hopefully) near future. In its place went my framed painting of Pilot Mountain, located in North Carolina. My cousin, Mary K. Lee, is the artist, and that painting has lived with me in every home I’ve had since I got it as a kid.

We arranged our new couches (which were free on Craigslist – booyah!) around the new TV location, threw some knick-knacks on the built-ins, hung some pictures and called it a day.

Eventually, I got around to the thought of curtains for those three big windows that face the backyard. I looked around sort of lackadaisically (I love that word, and so rarely get the opportunity to use it in a sentence), but couldn’t find anything that I really liked that was reasonably priced. So instead, I scooted over to the fabric store to see what the clearance table had to offer me.

About $50 later, I had enough of this beautiful fabric to make six panels of curtains for the three windows:

I was really diggin’ the design and the color scheme – light blues and neutrals, with some light greens thrown in there. An afternoon with the fabric and my grandmother’s old Singer gave us this:

We were originally worried about the room still getting a lot of light, but those separate little windows above the main ones really bring in lots of sunshine. Best of both worlds.

A few weeks later, and after finally deciding that I couldn’t live another day with the wall color in the kitchen, we got down to business and set about picking a color palette for the family room, kitchen and dining room.

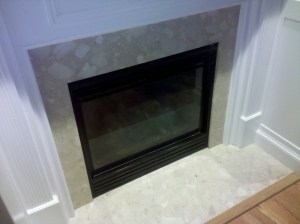
I started with the marble surrounding the fireplace to find a color for the walls in the family room:

Even with the fireplace as a guide, I couldn’t settle on the perfect warm, neutral shade. I was perusing Young House Love one day, and thanks to John and Sherry, I discovered Glidden Water Chestnut. They had used it in one of spare bedrooms in their first house, and I fell in love with the peachy tones it brought out in the room. Plus, it was almost an exact match to the lighter shades in the fireplace marble. Win!

The Mister and I are really happy with it. It ties the entire room together and gives it a very homey feeling, plus it brings out the colors in the fireplace, AND the the neutral tones that are in the curtains.
Once we selected Water Chestnut, we found a dining room color that we both adored. (A lovely shade of blue, but more on that later). Once we had that, we were in search of a color to tie the warm Water Chestnut in with the cool shade of blue we picked for the dining room.
That’s how we settled on the Glidden Stone White color – it’s light, airy and cool, but still flows into the family room’s warmness.

You can see the kitchen wall sporting Glidden Stone White, and then to the right the family room wall that’s rockin’ Glidden Water Chestnut. We’re really happy to have the distinct looks we wanted in each room, but a unified look for the space.

As an aside – huge props to the Room Painter on Glidden’s website. I’ve never seen one that reflects the colors as accurately as Glidden’s does, and it was a big help in figuring out the color conundrum for the three rooms. 

As for the family room, we’re still making some changes and adding some finishing touches, but it’s already firmly established itself as the heart of our house (not to mention the perfect place for Mad Men marathons. I told you – we’re obsessed.)

And because every good post should have a before and after (and sometimes even a middle), I leave you with this:

Before
After

Drab to Fab: Refinishing an Antique Cabinet

“Look at that cabinet!”

Driving down the highway with my mom, we happened to pass a random antique shop on the side of the road. And sitting outside, on the front stoop, was a beauty. An old, white, kitchen-cabinet-hutch-type-thingy. It had glass doors on top, and cupboards on the bottom; and I loved it.

After my exclamation, my mom (God love her) pulled a u-turn. Before I knew it, she had bartered the guy down to right around $100 (down from $175!) and I was calling the Mister to bring the pickup truck over and load this bad boy up.

And thus began my first refinishing project.

Here’s what it looked like sitting in my garage, taken apart into two pieces for easier transportation:

The bottom half, complete with peeling paint and duct tape.


The top half, with red paint inside and dirty red and white fabric lining the shelves.

 The fabric was the first thing to go, because it was N-A-S-T-Y. Then, I started sanding it down, but that wasn’t doing enough to take off the old white paint. I didn’t want to just paint over, because it was dingy and brown, and peeling at the bottom. (It looked like it had been in a place that flooded, because the bottom of the bottom half was a mess). 

So, I went to Plan B. I bought some low-VOC Citrustrip spray, and put that on there. It took about two cans of the spray to get the entire thing covered, and the old white paint came right off with a paint scraper. After that, I used stripping pads to get the leftover stripping gunk off, and then I wiped down everything with a rag soaked in Odorless Mineral Spirits to clean up. 

Before priming, I went over the entire thing again with my trusty hand-sander, using 220 grit paper. 

I was able to take the bottom doors off, as well as the hardware. I spraypainted the handles with a brushed nickel spray paint in a satin finish, and they looked good as new. Unfortunately, the top doors were stuck on there because the hardware had been painted over a couple of times already. So, I spray-painted the handles and left the mounting hardware as it was.

Three coats of Kilz Primer (I used the spray paint version on that back piece to cover the red) and three coats of leftover BM White dove later:

 Its new home in the family room

I wanted to cover the red on the inside, because it didn’t really go with any of my colors in the house. I wasn’t sure what color I wanted the inside to be, so I left it white until I was sure. Now, it’s kind of grown on me. Although, I could wallpaper the back with a fun design…

The metal tray that sticks out still had the red color on the edging, but it didn’t bother me because it’s not as noticable. Besides, the tray is the perfect size to showcase our wedding album, and it just so happens our colors were black, white and an accent of red. Love it.

Now we just need to fill it up with fabulous things to showcase those beautiful glass doors…


Giving it a Whirl

In response to many suggestions from family and friends, the Mister and I, (although, he doesn’t know it yet), are embarking on a journey to share all of our decorating, designing and do-it-yourselfing with the world. Or at least, with the family and friends that have voiced interest.


This is a whole new experience, so bear with us while we get a handle on this crazy blog-thing and all that comes with it.


Soon to come – Phase I of the House Tour: The Before Pictures!